Chapter 7: Movement and Maneuver
Kevin Zucker once told me that movement is the most important part of a wargame. I have spent a decade designing games and I have not found a reason to disagree. Sieges and highly abstracted games can get away with minimal movement systems, but any simulation where maneuver matters demands careful attention. Everything about your game will be wrong if the movement system produces ahistorical results. The combat system, the OOB, the map: none of it matters if the units can reach places they should not reach in the time the turn represents.
Movement Points and Terrain
The basic framework is familiar to anyone who has played a wargame. Units have a Movement Allowance printed on the counter. Terrain costs movement points to enter. Clear terrain costs 1 MP, rough terrain costs more, roads cost less. The designer’s job is making sure those costs produce realistic movement patterns for the conflict being simulated.
Terrain effects gate movement in ways that reflect how formations moved on the ground. Some games assign different terrain costs based on unit type. Tanks pay more to enter woods than infantry does. Cavalry moves faster on open ground but suffers in mountains. These distinctions matter most at tactical and grand-tactical scales where the physical characteristics of the unit shape how it interacts with terrain. At the operational and strategic level, you can usually get away with uniform terrain costs because the time scale absorbs the differences.
The test is simple. Set up your game, move every unit at full allowance for a few turns, and measure where they end up. Compare that to where the historical forces were after the same amount of time. If your German panzer divisions are reaching Moscow a month early, your movement costs are wrong. If your Napoleonic infantry cannot keep pace with the historical advance, something needs to change. Appendix D provides historical march rate data for exactly this purpose.
Zones of Control
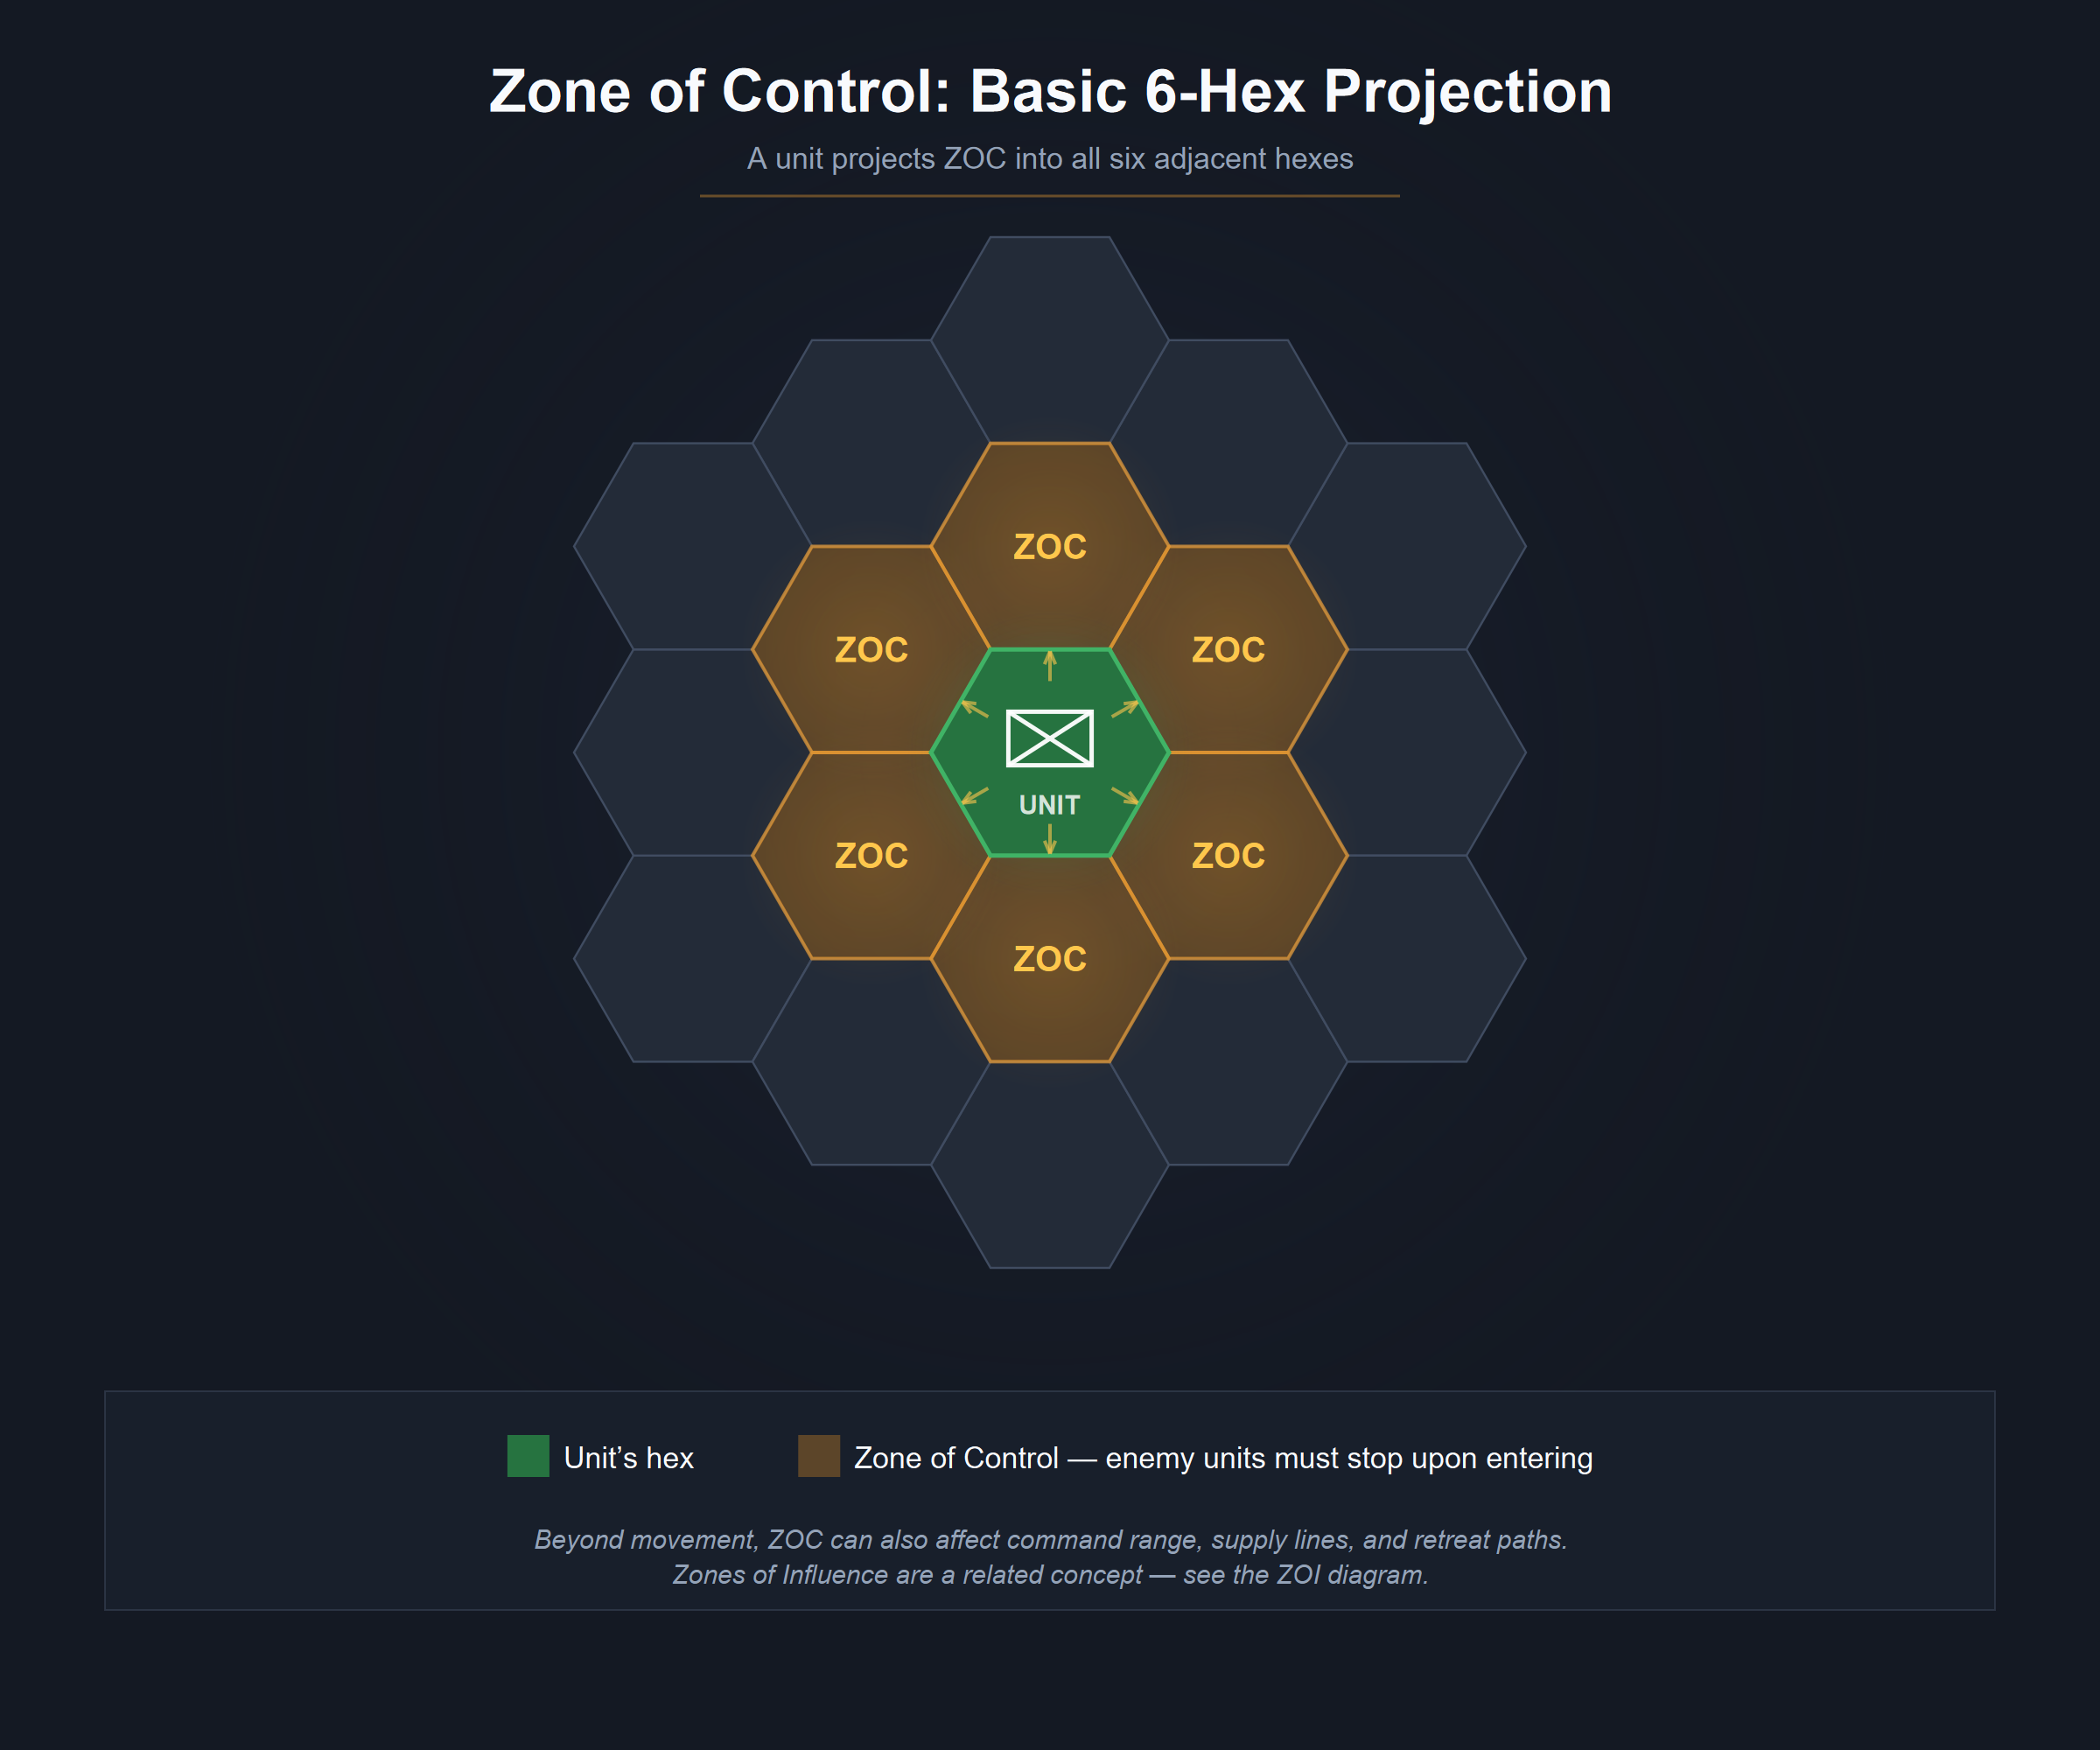
Zones of control are an abstraction of movement in their own right. A ZOC represents a unit’s ability to control and influence the space around its center of concentration. Patrols, observation posts, and the threat of fire all project outward from a unit’s position without the unit physically occupying that ground.
The most common ZOC rule stops enemy movement. A unit entering an enemy ZOC must halt. This works well for many operational games, but it can produce unrealistic results depending on the scale and era. A single battalion projecting a ZOC that halts an entire corps makes no sense at the strategic level. At the tactical level, a rigid ZOC can create impenetrable defensive lines that no historical force produced.
Several of my games handle ZOC differently depending on what the simulation needs. In the DAMOS Barbarossa trilogy, ZOC projects from most German units but only from Soviet armor and mechanized forces. Soviet foot infantry cannot freeze German movement the way a panzer division freezes theirs. This asymmetry models the German advantage in operational flexibility without touching the combat system at all. In 1950 Korea, UN ZOC does not extend into non-clear terrain, reflecting the reality that UN forces could not project control into the Korean mountains the way they could across open ground.
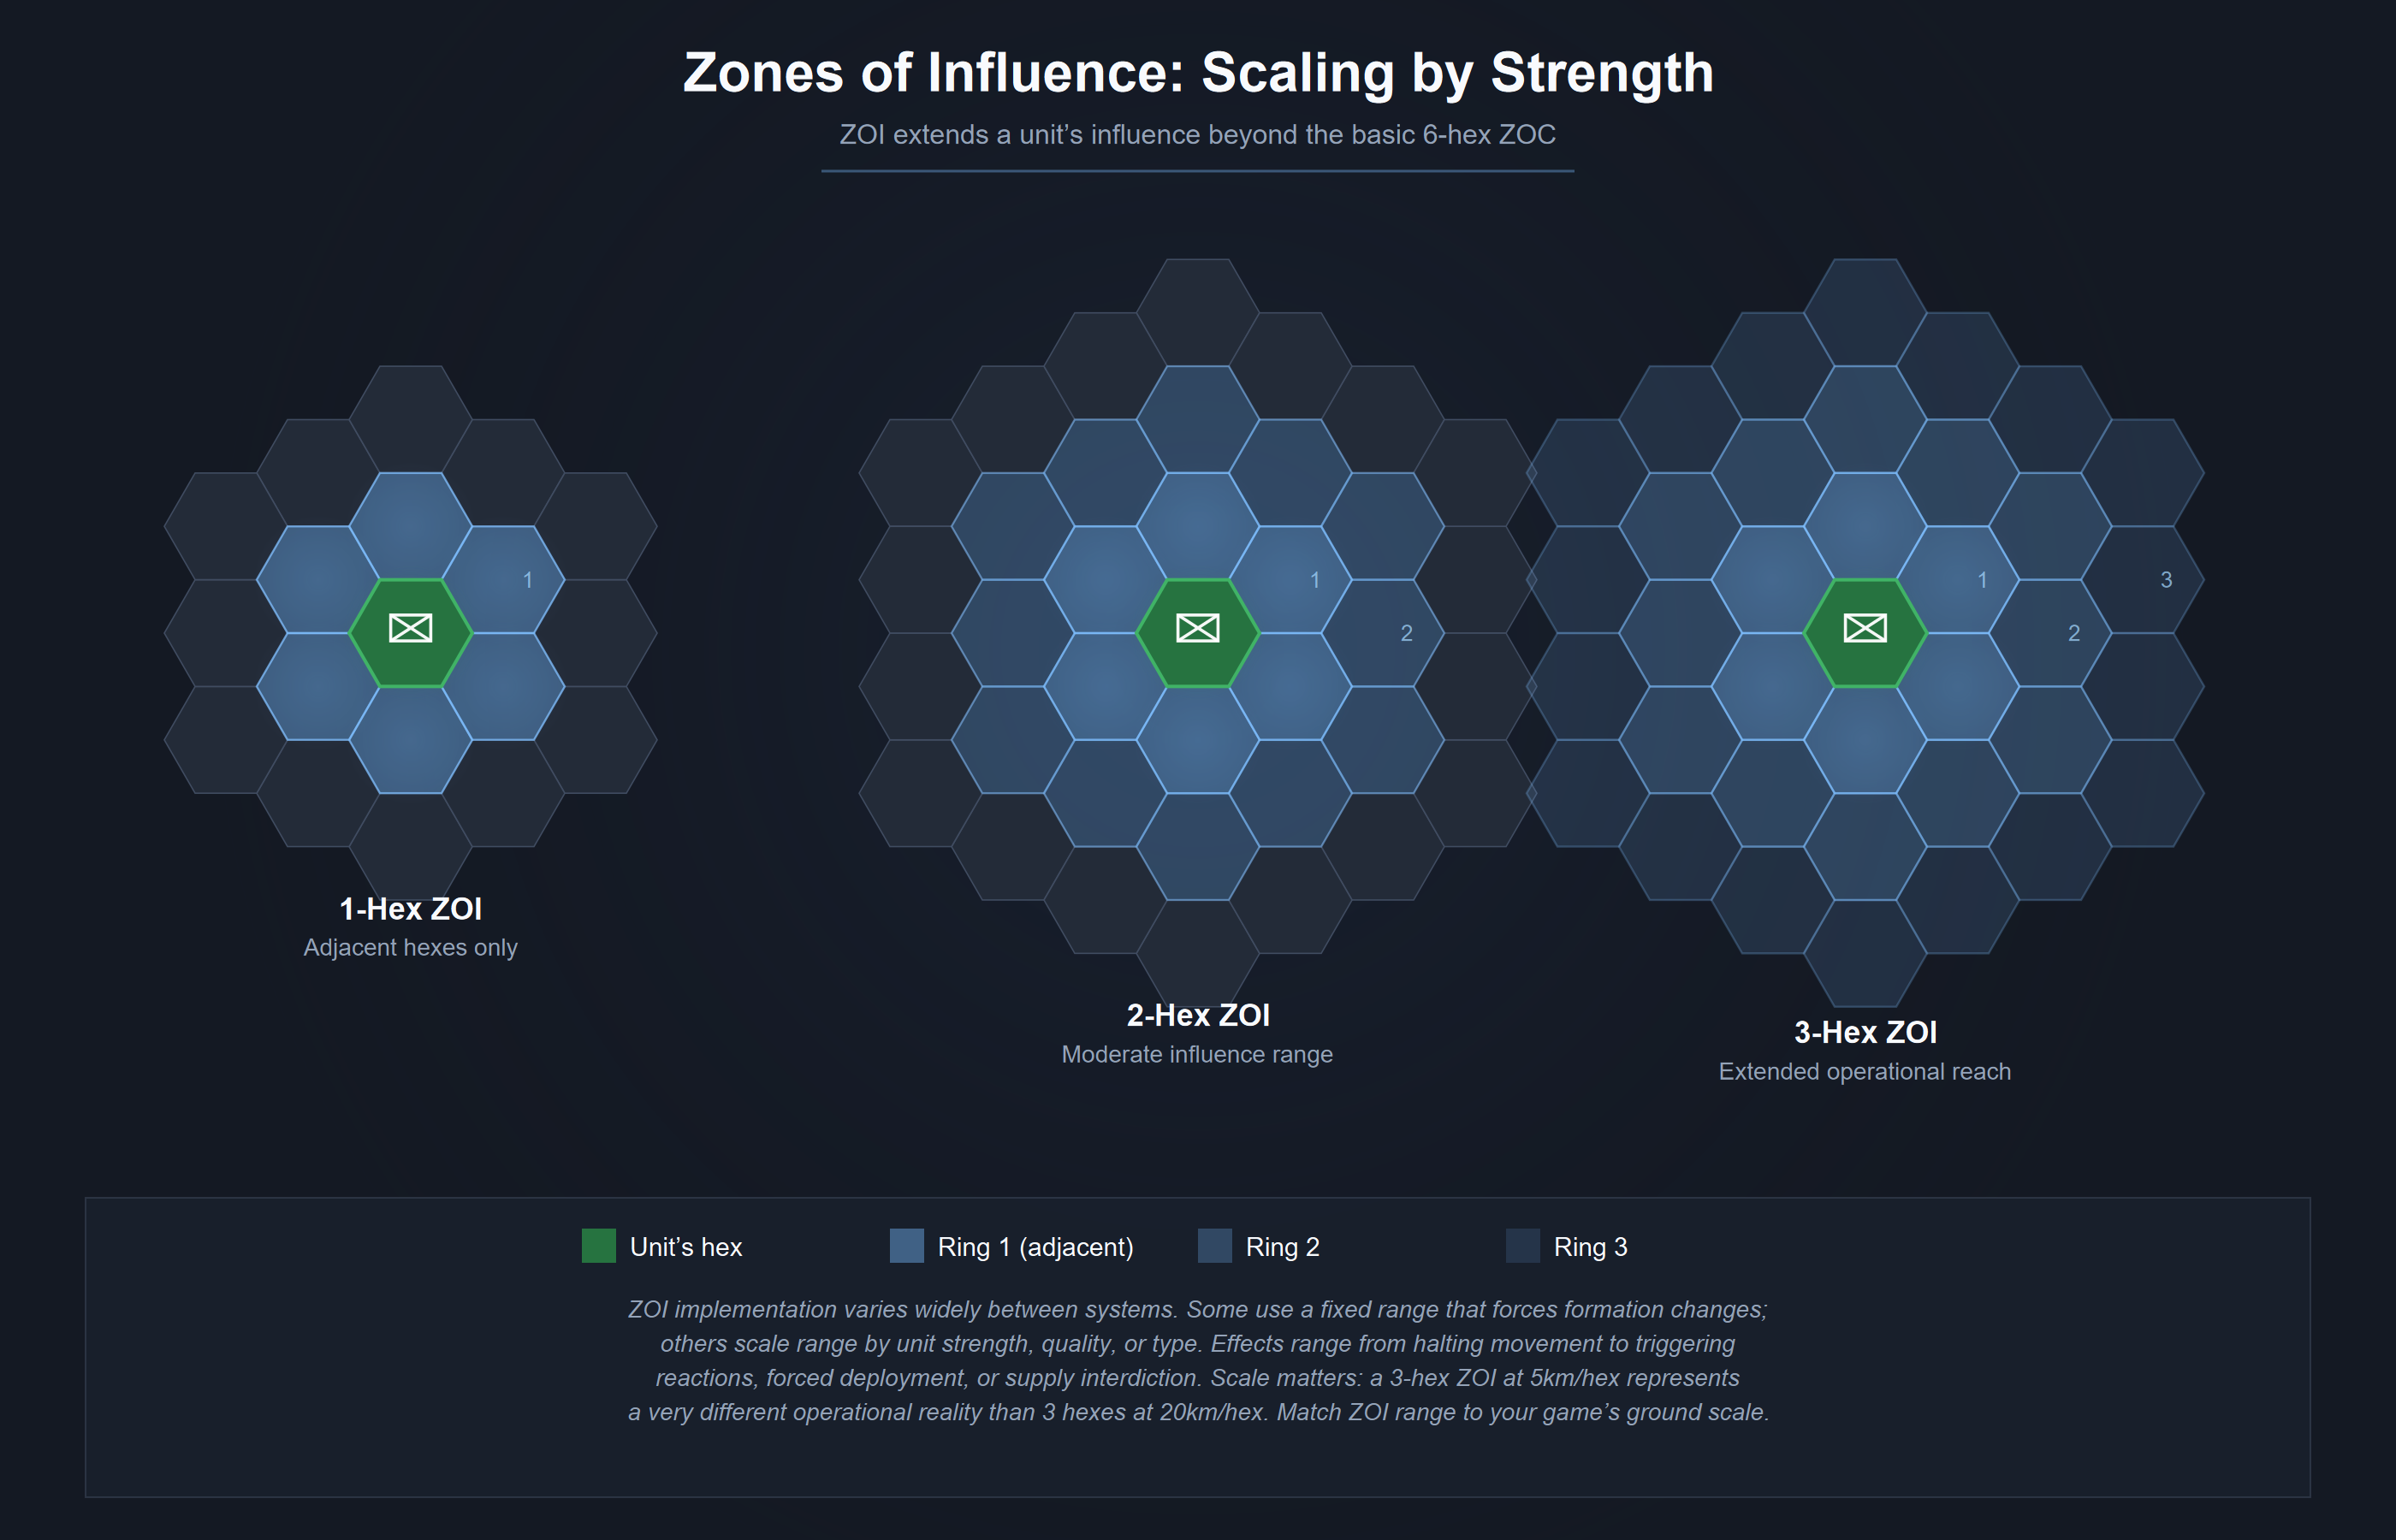
The DAMOS series introduces Zones of Influence that scale with unit strength. A division with 7-12 SP projects a ZOI of 2 hexes. A division with 13 or more SP projects 3 hexes. Stronger units control more space. Non-phasing units within ZOI range can attempt Reactions, rolling to move into threatened hexes or fall back. This models the OODA loop at a mechanical level. A unit with greater combat power has a longer operational reach, and defending units must decide whether to react before the threat materializes.
Koniggratz and Mars La Tour use a different approach. Units project a Zone of Influence at 2-hex range that forces any enemy in March Formation to flip to Battle Formation and stop. The ZOI does not halt movement outright. It forces a formation change. You can still move into an enemy’s sphere of influence, but you arrive deployed for combat rather than strung out in a road column. This captures the historical reality that armies approaching contact had to shift from movement posture to fighting posture well before the first shots were fired.
The OODA Loop and Command Flexibility
OODA stands for observe, orient, decide, act. In military terms, it describes how quickly a force can process new information and respond. The concept is abstract, but its effects on the battlefield are concrete, and your movement system is where those effects show up.
The Franco-Prussian War is one of the clearest historical examples. The French army was highly regarded by most of Europe in 1870. The Prussians destroyed and conquered it in less than three months. The armies looked roughly even on paper. The difference was that the Prussian army could do several things in the time it took the French to do one.
The Prussian general staff had developed Mission Command, empowering officers at a tactical level to make decisions based on their own initiative and experience. When a French commander was killed, the unit waited for hours until someone sent new orders. French troops would not march to the sound of the guns without explicit authorization. The army’s command structure depended on Napoleon III directing the whole force, and Napoleon III was no tactical genius. At Mars La Tour, a few Prussian corps effectively froze the entire French army because the French could not organize a response fast enough.
This translates into game mechanics through the movement and activation systems. In We Were Not Cowards, Prussian divisions break down into component brigades freely, while French divisions must pass an Initiative Check to do the same. Failure costs 2 MP. The Prussians get 2 March Orders per turn. The French get 1. The French have better rifles: Prussian units pay +1 MP to enter a French ZOC because of the Chassepot’s superior range. The Prussians have better artillery, more activation flexibility, and a command system that lets their officers react without permission. The French player spends the game with better weapons and worse options.
The same principle works at every scale. In a card-driven game, one side might have a larger hand. In a chit-pull game, one side might have more activation chits in the cup. In a game with initiative ratings, better-trained forces check at a higher number. If one side could act faster and more flexibly than the other, your movement and activation system needs to reflect that, or the game will not feel like the conflict it represents.
Types of Movement
Road Movement
Road movement allows units to move along roadways at a faster rate than cross-country marching. At smaller scales, road movement introduces considerations about column length and vulnerability. A battalion stretched along a road in march formation occupies more linear space and presents a softer target than the same battalion deployed in a fighting position.
Several of my games model this through formation states. In Sedan 1940, units have Travel Mode and Deployed Mode. Travel Mode gives higher movement but lower combat values and penalties when targeted. In Koniggratz and Mars La Tour, units have March Formation (4 MP for infantry) and Battle Formation (1 MP). The shift between these states is the central tension of the game. You need March Formation to get anywhere, but arriving in March Formation near the enemy is how units get destroyed.
Imperial Bayonets uses Road March as a specific movement mode. Units pay 0.5 MP per road hex but cannot be adjacent to each other. If an enemy unit moves adjacent to a force in Road March, the force suffers temporary Demoralization. The speed benefit comes with genuine risk.
Rail Movement
Rail movement is a strategic consideration that becomes relevant at the operational and grand-tactical level, especially from the mid-19th century onward. The key design question is how to handle rail movement’s vulnerabilities. Units on trains are not fighting formations. They are cargo.
In 1914: East Prussia, only the German player has rail movement, reflecting the Prussian rail network’s superiority over Russian infrastructure. Rail capacity increases over the first three turns as the system mobilizes. In the DAMOS Barbarossa trilogy, German supply depends on converting captured Soviet rail lines to European gauge, 1d3 hexes per turn, a slow process that constrains the entire offensive. In 2022: Ukraine, Russian logistics depend on railhead markers that must trace through friendly-controlled rail hexes back to Russia. Ukrainian airstrikes and partisan activity can push those railheads backward, stretching Russian supply lines beyond their breaking point.
Naval Movement
Naval movement tends to be non-linear, complex, and difficult to abstract well. It requires genuine expertise in how naval operations functioned to create a useful model. I avoid most naval systems for this reason. The shell weight formula Jack Greene taught me for my WWI naval game was one piece of a much larger puzzle, and I had to lean on his experience to get the rest right. If you are designing a game with naval movement, find someone who knows the subject at the level of detail your simulation requires. Do not try to wing it.
Forced March and Strategic Movement
Forced marching can be represented in several ways depending on the scale. Tactical squads might exhaust themselves for extra movement. Grand-tactical battalions of the 19th century might break down into road columns. The simplest approach is allowing a unit to double its movement allowance outside of enemy ZOC, a common convention for strategic movement in operational games.
Forced marching should carry a cost. Free strategic movement is simpler to implement, but forced marches wore units down, and your game should reflect that. In Imperial Bayonets, Road March carries the vulnerability of Demoralization if caught by the enemy. In 1916, units that spend more than half their MP without a line of communication check the Attrition Table. In the LCOS series, Forced March gives a second MP budget equal to the original, but units must roll a straggler check. Entering an enemy ZOC during a forced march makes that roll worse.
The specific penalty matters less than having one. If a player can rush units across the map at double speed with no consequences, they will do it every turn, and your movement system becomes a teleportation mechanic.
Other Movement Restrictions
ZOC is the most common and most direct way to restrict movement, and it is a valid approach across most scales. Terrain costs are the other universal gate. Beyond those, command systems offer another way to influence where and how units move without putting hard stops on the map.
Command range is one form. In Imperial Bayonets, units outside their officer’s Command Range must pass Initiative Checks to activate. Failing the check means the unit sits still or moves with reduced MP. The restriction lives in the command system, and it affects movement by making unsupported maneuvers unreliable rather than impossible. A player can still try to send a unit off on its own. It just might not go.
Koniggratz, Mars La Tour, and The Alma take a more explicit approach. HQ markers are placed on the map each turn, and units must move toward a hex within the HQ’s range. The player picks where the HQ goes, and the units follow. You decide where the army is going. The units figure out how to get there. This forces you to think about command intent rather than individual unit optimization.
These are tools, not replacements for ZOC or terrain. A game can use all of them together. Imperial Bayonets has ZOC, terrain costs, and command range all operating at once, each one restricting movement in a different way for a different reason.
Stacking and Movement
Stacking limits are less about movement than about force density, but they interact with the movement system in ways worth considering. Both Imperial Bayonets and Zucker’s Library of Napoleonic Battles charge +1 MP for units entering an occupied hex. This models the command overhead of consolidating forces. Coordinating the arrival of multiple formations in the same space takes time and creates friction. That 1 MP cost is small but cumulative. It discourages casual stacking and rewards players who think about the timing and sequencing of their formations.
At the tactical level, stacking limits may need to be enforced more strictly. Overstacking a hex with units that could not physically occupy that space breaks the simulation. At the operational and strategic level, stacking limits are more about command capacity than physical space, and the +1 MP approach handles it with less bookkeeping than a hard cap.
Common Mistakes
The most common movement mistake is units that are too fast for the turn scale. If your weekly turns let a Napoleonic corps march 200 miles, something is broken. Check your movement allowances against historical march rate data before you do anything else.
A related mistake is ZOC rules that create unrealistic barriers. If a single regiment can freeze an entire army in place because it projects a ZOC across a river, the ZOC is doing too much work for the game’s scale. Consider making ZOC conditional: projecting only into certain terrain types, only from certain unit types, or only from units above a certain strength threshold.
The third common mistake is movement systems that are too permissive. When I was working on 1968: Tet, the Vietcong could maneuver all over the map with almost no restrictions. The simulation fell apart because unrestricted movement eliminated the friction that defined the actual conflict. The game did not work because the VC player had more options than the historical VC ever had. I shelved the project rather than try to patch it. I am not sure I had enough understanding of the subject to fix it. If your movement system is wrong, the whole game is wrong, and sometimes the honest answer is that you do not know enough about the conflict to get it right.
Figure out movement before you start building the rest of the game. Changing your movement system mid-project means changing your scale, your terrain effects, your combat results, and your scenario setups. I have done it. It is miserable. Get it right early.